개발자 워크플로우 기본 Developer Workflow Basics
안드로이드용 app 개발 워크플로우는 개념적으로 다른 app 플랫폼과 같습니다.
하지만, 잘 설계된 안드로이드용 app을 구축하려면 몇 가지 특별한 도구가 필요합니다.
다음 목록은 안드로이드 app 구축 과정의 개요로, 각 개발단계에서 사용해야 하는 일부 안드로이드 스튜디오 도구에 대한 링크가 포함되어 있습니다.
The workflow to develop an app for Android is conceptually the same as other app platforms. However, to efficiently build a well-designed app for Android, you need some specialized tools. The following list provides an overview of the process to build an Android app and includes links to some Android Studio tools you should use during each phase of development.
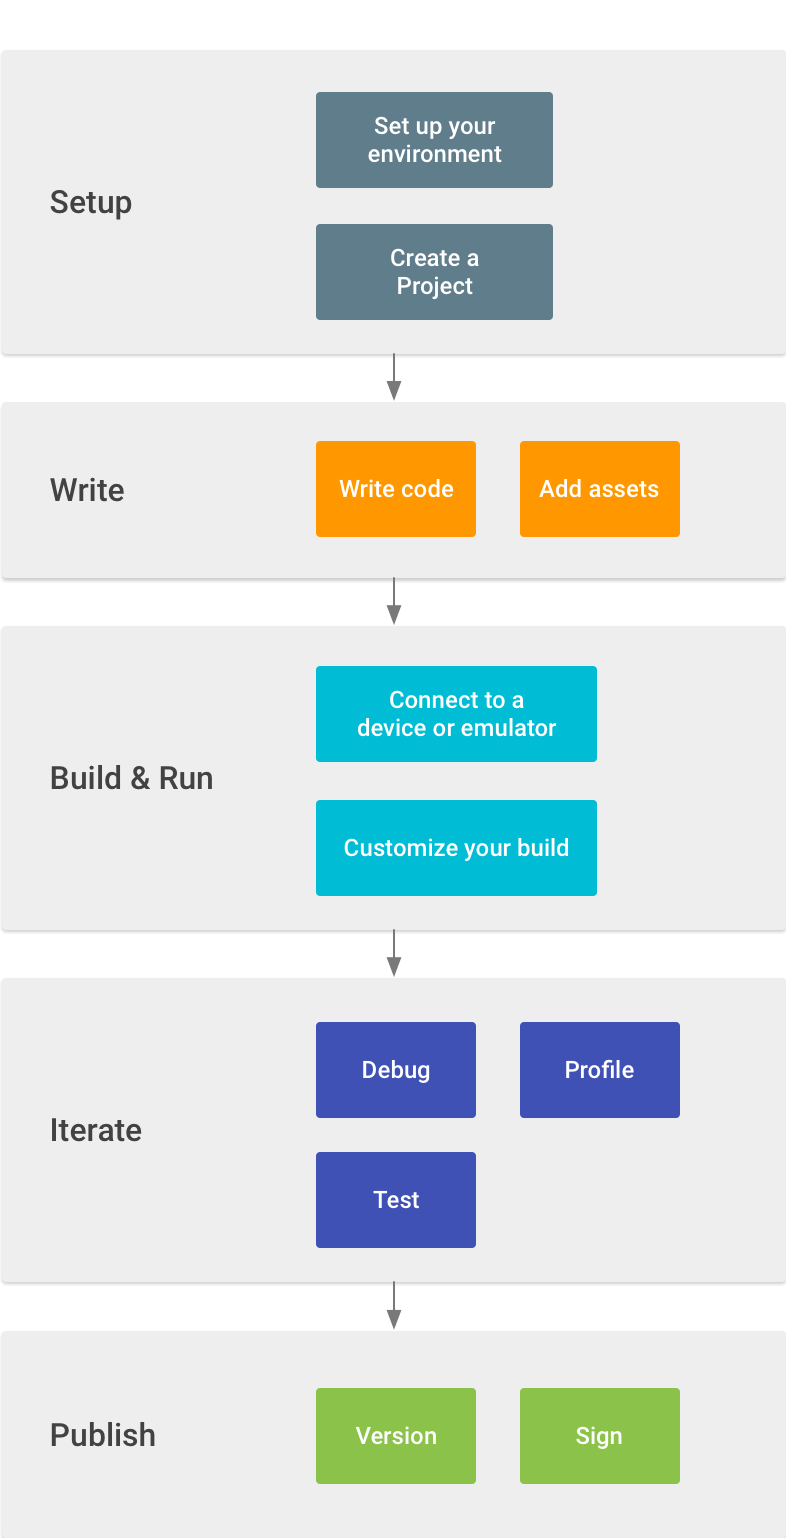
- 작업공간 셋업하기 Set up your workspace
이 단계는 이미 끝나있는 단계일수도 있습니다: Android Studio 설치와 project 만들기.
This is the phase you probably already finished: Install Android Studio and create a project.안드로이드 개발 기초를 가르치는 안드로이드 스튜디오를 가진 워크스루에서, Building Your First App에 대한 가이드를 체크아웃 하세요.
For a walkthrough with Android Studio that teaches some Android development fundamentals, also check out the guide to Building Your First App. - app 작성하기 Write your app
이제 작업을 시작할 수 있습니다.
Android Studio에는 작업을 보다 빠르게 하고, 양질의 코드를 작성하고, UI를 디자인하고, 서로 다른 타입의 장치를 위한 리소스를 만드는 것을 도와주는, 다양한 도구와 지식이 포함되어 있습니다.
사용 가능한 도구와 기능은 Write Your App.를 참조하세요.
Now you can get to work. Android Studio includes a variety of tools and intelligence to help you work faster, write quality code, design a UI, and create resources for different device types. For more information about the tools and features available, see Write Your App. - 빌드하고 실행하기 Build and run
이 단계에서, emulator 또는 Android-powered device에 설치하고 실행시킬 수 있고, 버그를 찾을 수 있는, APK 패키지로 프로젝트를 빌드합니다.
코드 실행 방법에 관한 추가 정보는 Build and Run Your App를 참조하세요.
During this phase, you build your project into a debuggable APK package that you can install and run on the emulator or an Android-powered device. For more information about how to run your code, see Build and Run Your App.사용자는 자기 입맛에 맞게 빌드를 조정할 수 있습니다.
예를 들어, 동일한 프로젝트로부터 서로 다른 타입의 APK를 생성시키는 build variants를 만들 수 있고, APK 파일을 보다 작게 만들기 위하여 code와 resources를 응축시킬 수 있습니다.
사용자가 빌드를 조정하는 것은 Configure Your Build를 참조하세요.
For an introduction to customizing your build, see Configure Your Build.
You can also begin customizing your build. For example, you can create build variants that produce different types of APKs from the same project, and shrink your code and resources to make your APK file smaller. For an introduction to customizing your build, see Configure Your Build. - Debug, profile, and test
This is the iterative phase in which you continue writing your app but with a focus on eliminating bugs and optimizing app performance. Of course, creating tests will help you in those endeavors.
For information about basic debugging tasks, read Debug Your App and Write and View Logs.
To view and analyze various performance metrics such as memory usage, network traffic, CPU impact, and more, use Android Monitor.
And for an introduction to building tests, see Test Your App.
- Publish
When you're ready to release your app to users, there are just a few more things to consider, such as versioning your app and signing it with a key. For more information, see the Publishing Overview.
'User Guide' 카테고리의 다른 글
| 프로젝트 또는 app모듈 만들기 Create a Project or App Module (7) (0) | 2016.06.01 |
|---|---|
| 프로젝트 관리 Manage Your Project (6) (0) | 2016.06.01 |
| IDE와 도구 업데이트 하기 Update the IDE and Tools (4) (0) | 2016.06.01 |
| 안드로이드 스튜디오 컨피규어 하기 Configure Android Studio (3) (0) | 2016.06.01 |
| Migrate to Android Studio from Eclipse (2) (0) | 2016.06.01 |
댓글