AdSense Ads
애드센스 광고용 코드를 자동으로 삽입하는 WordPress 애드센스 플러그인
WordPress AdSense plugin to automatically insert code for AdSense ads
- 유연한 WordPress 애드센스 플러그인을 찾고 계십니까?
Looking for a flexible WordPress AdSense plugin? - 웹사이트에서 최적의 수익을 창출하려면?
To optimally monetize your website? - 다른 플러그인이 실패한 광고를 삽입하려면?
To insert ads where other plugins have failed?


Introduction
애드센스는 웹사이트에 광고를 게재하여 온라인에서 무료로 간편하게 수익을 올릴 수 있는 방법입니다.
Google 애드센스는 콘텐츠 사이트의 Google 네트워크에 있는 게시자가 사이트 콘텐츠 및 잠재고객을 대상으로 하는 자동 텍스트, 이미지, 비디오 또는 대화형 미디어 광고를 게재할 수 있도록 Google에서 실행하는 프로그램입니다.
AdSense is a free, simple way to make money online by placing ads on your website. Google AdSense is a program run by Google that allows publishers in the Google Network of content sites to serve automatic text, image, video, or interactive media advertisements, that are targeted to site content and audience.
애드센스 광고를 표시하려면 웹사이트에 애드센스용 코드를 삽입해야 하는데, 즉 WordPress 애드센스 플러그인이 필요합니다.
Ad Inserter는 모든 페이지에 애드센스 광고용 코드를 자동으로 삽입하는 완벽한 도구입니다.
페이지가 애드센스 프로그램 정책을 준수하는지 확인하기 위한 애드센스 통합 및 승인 옵션 clearance options 은 애드센스로 웹사이트에서 수익을 창출하는 데 도움이 되는 2가지 고급 기능에 불과합니다.
여기에서는 애드센스 광고용 코드의 특정 설정에 대해 설명합니다.
자세한 내용은 자동 삽입, WordPress 페이지 유형 및 코드 편집도 확인하십시오.
To show AdSense ads you need to place code for AdSense on your website – you need WordPress AdSense Plugin. Ad Inserter is a perfect tool to automatically insert code for AdSense ads on any page. AdSense integration and clearance options to make sure that your page will comply with the AdSense program policies, are just two advanced features that will help you to monetize your website with AdSense. Here we explain specific settings for the code for AdSense ads. For details please check also automatic insertion, WordPress page types and code editing.
Ad Inserter는 단순한 WordPress 애드센스 플러그인이 아닙니다 - 페이지 어디에나 코드나 광고를 삽입할 수 있는 범용 플러그인입니다.
Please note that Ad Inserter is more than just WordPress AdSense Plugin – it is a universal plugin that can insert any code or ads anywhere on the page.
Ad Inserter 플러그인을 설치하려면 WordPress 대시보드에 로그인하고, WordPress 메뉴에서 Plugins를 클릭한 다음 플러그인 페이지 상단의 Add New를 클릭하고, Ad Inserter를 검색한 후 결과에서 Ad Inserter를 선택하고 Install을 클릭한 다음 플러그인을 활성화합니다.
또는 디스크에 다운로드한 다음 Upload Plugin을 클릭하고, 다운로드한 파일을 선택한 다음 지금 설치를 클릭한 다음 플러그인 활성화를 클릭할 수 있습니다.
To install Ad Inserter plugin log in to your WordPress dashboard, click on Plugins in the WordPress menu, click on Add New on top of the plugin page, search for ad inserter, select Ad Inserter from the results, click Install and then Activate the plugin.
Alternatively you can download it to your disk and then click on Upload Plugin, choose file you have downloaded, click on Install now and then Activate the plugin.

For plugin settings go to WordPress menu Settings > Ad Inserter.
플러그인 설정은 WordPress 메뉴 설정 > 광고 삽입기로 이동합니다.
여기에서는 Ad Inserter 플러그인을 사용하여 웹사이트에 애드센스 광고를 게재하는 방법을 단계별로 설명합니다.
아직 애드센스 계정이 없다면 먼저 가입해야 합니다.
Here we’ll explain step by step how to place AdSense ads on your website using Ad Inserter plugin. If you don’t have AdSense account yet you first need to sign up.
New to AdSense?
애드센스가 처음이신가요?
애드센스를 처음 사용하는 경우 먼저 위에서 설명한 대로 Ad Inserter 플러그인을 설치한 다음
If you are new to AdSense you should first install the Ad Inserter plugin as described above and then jump to
Advanced AdSense Ads – Quick links:
| Ad Unit |
| Text & display ads |
| Responsive ads |
| Ad code |
| AdSense Integration |
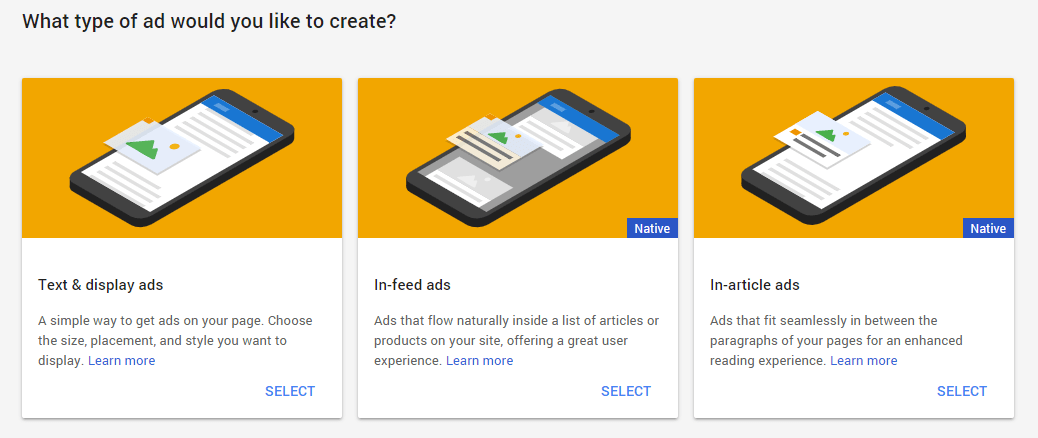
| In-feed ads |
| In-article ads |
| Auto ads |
| AMP ads |
| Sticky AMP ads |
| AMP Auto ads |
| Ads not displayed – troubleshooting |
Ad unit 광고 단위
광고 단위를 사용하면 웹사이트의 각 광고 공간에 대한 광고 유형을 정의할 수 있습니다.
각 광고 단위에 대해 광고를 표시하려는 위치에 삽입할 수 있는 광고 코드를 얻습니다.
이렇게 하면 웹사이트의 광고를 완전히 제어할 수 있습니다.
With ad units you can define type of ads for each ad space on your website. For each ad unit you get ad code which can be inserted where you would like to show ads. This way you have total control over the ads on your website.
Ad code: a snippet of HTML that when placed on any page of an approved site shows Google ads in a specific ad layout and format.
Ad unit: a set of Google ads displayed as a result of one piece of AdSense ad code.
The first step is to create ad unit. Once you are logged in to AdSense go to My Ads / Content / Ad Units and click on New ad unit. You will be asked to choose the type of ad.
광고 코드: 승인된 사이트의 페이지에 배치될 때 특정 광고 레이아웃 및 형식으로 Google 광고를 표시하는 HTML 스니펫입니다.
광고 단위: 하나의 애드센스 광고 코드의 결과로 표시되는 Google 광고 집합입니다.
첫 번째 단계는 광고 단위를 만드는 것입니다. 애드센스에 로그인한 후 내 광고/콘텐츠/광고 단위로 이동하여 새 광고 단위를 클릭합니다. 광고 유형을 선택하라는 메시지가 표시됩니다.
애드센스 유형
게시물이나 정적 페이지에 광고를 게재하려는 대부분의 경우 텍스트 및 디스플레이 광고가 필요합니다. 광고 단위에 이름을 지정합니다. 나중에 이 광고 단위를 찾는 데 도움이 되는 고유하고 설명이 포함된 이름을 사용하는 것이 좋습니다.
텍스트 및 디스플레이 광고
디스플레이 광고 단위를 만드는 방법
기사 내 광고 단위를 만드는 방법
'광고 크기' 섹션에서 표시할 광고의 크기를 선택합니다.
애드센스 광고 크기
여기에서 반응형(자동 크기) 광고 단위와 고정 크기 중에서 선택할 수 있습니다. 일반적으로 폭이 넓은 광고 단위의 실적이 더 좋습니다. 대부분의 경우 고정 크기 광고를 원하지 않는 한 반응형 광고를 선택할 수 있습니다. 이러한 경우 다양한 사이트에서 우수한 실적을 보이는 권장 광고 크기 중 하나를 선택하십시오. 모바일에서 실적이 좋은 광고 크기는 모바일 아이콘으로 표시됩니다.
반응형 광고
이 광고 단위는 페이지 레이아웃에 맞게 크기를 자동으로 조정합니다. 반응형 디자인으로 구축된 사이트에서 작동하도록 고안되었지만 비반응형 사이트에서도 작동합니다. 반응형 광고 단위를 사용하면 반응형 디자인 웹 페이지에서 작업하여 다양한 장치를 지원할 수 있습니다.
플로팅 광고(텍스트로 둘러싸인 광고) 또는 고정 광고(사이드바의 고정 위젯이 아닌 페이지 스크롤 시 고정된 광고)를 사용하려면 고정 크기 광고를 선택하거나 광고 블록 너비 및 높이를 정의해야 합니다. 광고 너비와 높이를 지정하거나(애드센스의 경우 내장 코드 생성기를 사용할 수 있음) 맞춤 CSS를 사용하여 광고 블록 너비와 높이를 정의할 수 있습니다(예: CSS 코드 너비: 160px; 높이: 600px; 추가).
그러나 여기서 선택한 텍스트 및 디스플레이 광고 유형에 관계없이 애드센스용 Ad Inserter 코드 편집기에서 크기 또는 반응성을 변경할 수 있습니다.
다음으로 광고 유형을 선택해야 합니다. 텍스트 광고와 디스플레이 광고를 모두 게재하는 것이 좋습니다. 더 많은 광고 유형을 표시하면 더 많은 수익을 올릴 수 있습니다.
또한 텍스트 광고 스타일을 선택하고 맞춤 채널을 정의하며 광고가 없을 때 표시할 항목을 정의할 수 있습니다. 설정에 만족하면 저장 및 코드 가져오기를 클릭합니다. 일단 광고 단위 i
In most cases where you would like to place ads on your posts or static pages you’ll need Text & display ads. Give your ad unit a name. It’s a good idea to use a unique, descriptive name that will help you find this ad unit later.
Text & display ads
How to create a display ad unit
How to create an In-article ad unit
In the “Ad size” section, choose the size of the ads that you’d like to show:

Here you can choose between responsive (automatic size) ad unit and fixed sizes. In general, wider ad units perform better. In most cases you can choose responsive ad unless you want a fixed size ad. In such case choose one of recommended ad sizes, which have shown to perform well across a variety of sites. Ad sizes that perform well on mobile are shown with a mobile icon.
Responsive ads
This ad unit will automatically adapt its size to fit your page layout. It’s intended to work with sites built with responsive design, but will work on non-responsive sites too. Responsive ad units allow you to support a wide range of devices by working with your responsive design web pages.
If you would like to use floating ads (ads wrapped with text) or sticky ads (ads that stay fixed when the page scrolls, not sticky widgets in the sidebar) you need to choose fixed size ads or define ad block width and height. You can do this by specifying ad width and height (for AdSense you can use built in code generator) or define ad block width and height using custom CSS (for example, by adding CSS code width: 160px; height: 600px;).
However, regardless of what type of Text & display ad you will choose here you will be able to change size or responsiveness in Ad Inserter code editor for AdSense.
Next you need to choose Ad type. We highly recommend that you display both text and display ads. By displaying more ad types, you can earn more revenue.
You can also choose text ad styles, define custom channels and what to display when no ad is available. When you are happy with settings click on Save and get code. Once the ad unit is created it will show in the list of ad units where you’ll be able to edit it or get the code for it. Ad unit changes may take up to two hours to appear in performance reports. Cgeck also How to customize your responsive Matched content unit.
Recently Google changed behavior of responsive ads on phones. Now they use full screen width by default and the ad code includes attribute data-full-width-responsive="true". If the attribute data-full-width-responsive is missing or set to true, the responsive ad will occupy full screen width. You need to set it to false (simply add the line if it is missing). For example:
<script async src="//pagead2.googlesyndication.com/pagead/js/adsbygoogle.js"></script>
<ins class="adsbygoogle"
     style="display: block;"
     data-ad-client="ca-pub-xxxxxxxxxxxxxxx"
     data-ad-slot="xxxxxxxxxxx"
     data-ad-format="auto"
     data-full-width-responsive="false"></ins>
<script>
  (adsbygoogle = window.adsbygoogle || []).push({});
</script>
Ad code
Please make sure no ad blocker is active when using AdSense functions.
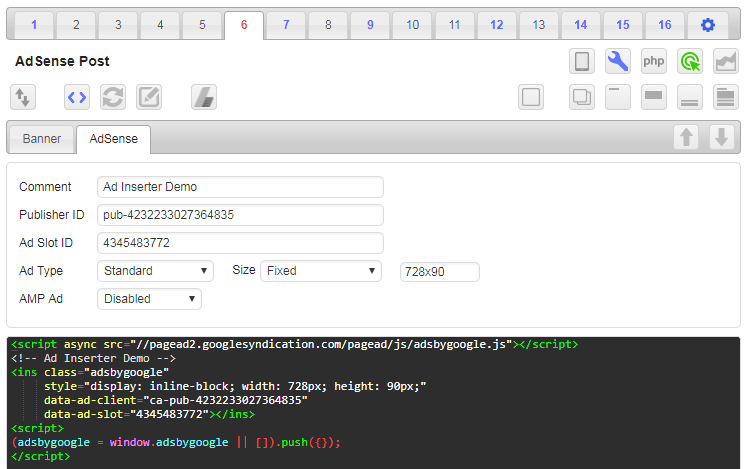
When ad unit is created you can get ad code for it. In the list of ad units click on Get code link below ad unit for which you need to get code. A window will pop up. You can choose between Asynchronous and Synchronous code type. In most cases you should use Asynchronous code. It will look something like this:
<script async src="//pagead2.googlesyndication.com/pagead/js/adsbygoogle.js"></script>
<!-- Ad Inserter 300x250 -->
<ins class="adsbygoogle"
     style="display:inline-block;width:300px;height:250px"
     data-ad-client="ca-pub-4504087291203902"
     data-ad-slot="3297227625"></ins>
<script>
  (adsbygoogle = window.adsbygoogle || []).push({});
</script>
Once you have the code you can copy it to Ad Inserter. In this example we’ll create one code block for ads above second paragraph on all posts. Select one empty code block (here we’ll use code block 10), click on the name to change it to something descriptive, paste the code for ad unit into code window below and set Automatic insertion to Before paragraph, Paragraph number to 2 and leave checked only Posts page type.
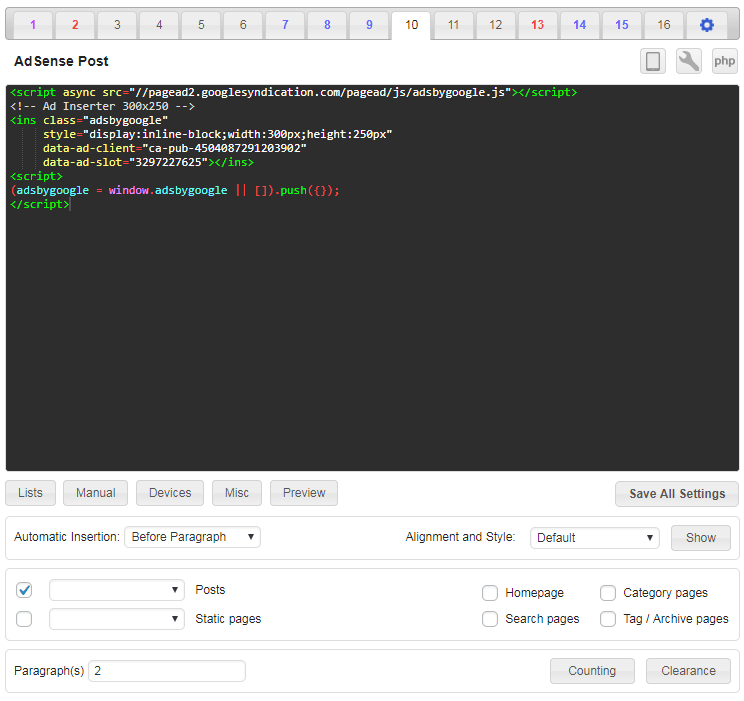
Save settings and check posts. Your code should be inserted and ads displayed before second paragraph in each post. However, it may happen that you’ll only get blank ad blocks. Check Ads not displayed – troubleshooting section below.
AdSense code generator
Ad Inserter has also a code generator tool for AdSense. Check Code editing for details. This tool is mainly intended to change the type of AdSense ads.
Not all conversions are possible: you can convert standard text & display ads to link ads or vice versa, fixed width ads to responsive ads and vice versa and you can enable or disable ads on AMP pages. Once you have the Publisher ID and Ad Slot ID entered (or imported) you can change ad type, ad size (fixed, fixed by viewport or responsive) and ad type for AMP pages.
Once you are happy with the settings click on the generate button and the the plugin will generate ad code for the AdSense ad in the code window of the current block.

For standard and link ads you can choose between fixed, fixed by viewport and responsive ad sizes.
- Responsive means that the ad will resize to fill available width. Suitable for all devices, however, it will not work when available width is not known (floating or sticky ads). In such case you need to specify ad size. You can do this by specifying ad width and height (for AdSense you can use built in code generator) or define ad block width and height using custom CSS (for example, by adding CSS code width: 160px; height: 600px;). Recently Google changed behavior of responsive ads on phones. Now they use full screen width by default and the ad code includes attribute data-full-width-responsive="true". If the attribute data-full-width-responsive is missing or set to true, the responsive ad will occupy full screen width. You need to set it to false (simply add the line if it is missing). Check responsive AdSense code for details.
- Fixed means that you define one ad size and it will be used for all insertions of this code block.
- Fixed by viewport means that you can specify fixed ad size for each viewport (device or screen size as defined in general plugin settings tab ⚙ / tab Viewports). This is the best choice for AdSense ads when there is a need to use different ad sizes on different devices. Leave size empty to disable ad for the selected viewport.
댓글