Test Your App
Android provides an integrated framework that helps you test all aspects of your app. The Android platform and Testing Support Library include tools and APIs for setting up and running test apps within an emulator or physical device.
This document guides you through key concepts related to Android app testing, and provides an overview of the testing tools and APIs developed by Google. If you want to skip the conceptual overview, and start learning how to build and run your tests using these APIs and tools, go to Getting started with testing in Android Studio. If you are not using Android Studio, go to Testing from the command line.
Testing Concepts
Android testing is based on JUnit. In general, a JUnit test is a method whose statements test a part of the app. You organize test methods into classes called test cases, and group test cases into test suites.
In JUnit, you build one or more test classes and use a test runner to execute them on your local machine. With Android Studio, you can build one or more test source files into an Android test app and use it to test your app on the Emulator or physical Android device.
The structure of your test code and the way you build and run the tests in Android Studio depend on the type of testing you are performing. The following table summarizes the common testing types for Android:
| Type | Subtype | Description |
|---|---|---|
| Unit tests | ||
| Local Unit Tests | Unit tests that run on your local machine only. These tests are compiled to run locally on the Java Virtual Machine (JVM) to minimize execution time. Use this approach to run unit tests that have no dependencies on the Android framework or have dependencies that mock objects can satisfy. | |
| Instrumented unit tests | Unit tests that run on an Android device or emulator. These tests have access to Instrumentation information, such as the Context of the app you are testing. Use this approach to run unit tests that have Android dependencies which mock objects cannot easily satisfy. | |
| Integration Tests | ||
| Components within your app only | This type of test verifies that the target app behaves as expected when a user performs a specific action or enters a specific input in its activities. For example, it allows you to check that the target app returns the correct UI output in response to user interactions in the app’s activities. UI testing frameworks like Espresso allow you to programmatically simulate user actions and test complex intra-app user interactions. | |
| Cross-app Components | This type of test verifies the correct behavior of interactions between different user apps or between user apps and system apps. For example, you might want to test that your app behaves correctly when the user performs an action in the Android Settings menu. UI testing frameworks that support cross-app interactions, such as UI Automator, allow you to create tests for such scenarios. |
Based on the type of test you want to create, you need to configure the test code source location and the project dependencies in Android Studio as described in Getting Started with Testing.
Instrumentation
Android instrumentation is a set of control methods, or hooks, in the Android system. These hooks control an Android component independently of its normal lifecycle. They also control how Android loads apps.
The following diagram summarizes the testing framework:

Normally, an Android component runs in a lifecycle that the system determines. For example, an Activity object's lifecycle starts when an Intentactivates the Activity. The system calls the object's onCreate() method, on then the onResume() method. When the user starts another app, the system calls the onPause() method. If the Activity code calls the finish() method, the system calls the onDestroy() method. The Android framework API does not provide a way for your code to invoke these callback methods directly, but you can do so using instrumentation.
The system runs all the components of an app in the same process. You can allow some components, such as content providers, to run in a separate process, but you typically can't force an app onto the same process as another running app.
Instrumentation tests, however, can load both a test APK of your test classes and your app's APK into the same process. Since the components of your app and their tests are in the same process, your tests can invoke methods, and modify and examine fields in your app.
Testing Source Sets
When you create a new app module, Android Studio creates the src/test/ and src/androidTest/ source set directories for you. Place the test classes you want to run locally on your machine in the test/ source set and the test classes you want to run on an actual Android device in the androidTest/source set. Gradle uses the androidTest/ source set when generating the test APK you use to test your app. To learn more about build variants and source sets, read the Configure your build overview.
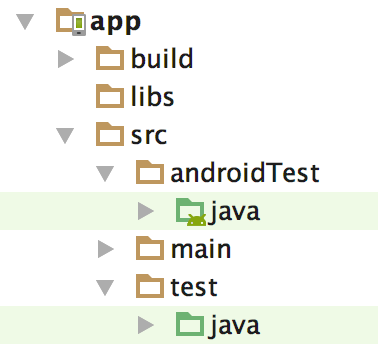
Figure 1. Default app module test directories.
Tests in the androidTest/ source set are common to all your build variants. However, you can create additional source set directories for tests that are specific to certain build variants:
src/
    main/
    androidTest/

    flavor1/
    androidTestFlavor1/

    flavor2/
    androidTestFlavor2/
For example, when building a test APK for the "flavor1" version of your app, Gradle uses both the androidTestFlavor1/ and androidTest/ source sets. By default, all tests run against the debug build type. You can change this to another build type by using the testBuildType property in your module-level build.gradle file, as shown in the following code snippet.
android {
    ...
    testBuildType "staging"
}
Gradle automatically generates manifest files for your androidTest/ source sets. Optionally, you can create your own manifest, for example, to specify a different value for minSdkVersion or register run listeners just for your tests. When building your app, Gradle merges multiple manifest files into one manifest.
Testing APIs
The following list summarizes the common APIs related to app testing for Android.
JUnit
You should write your unit or integration test class as a JUnit 4 test class. JUnit is the most popular and widely-used unit testing framework for Java. The framework offers a convenient way to perform common setup, teardown, and assertion operations in your test.
JUnit 4 allows you to write tests in a cleaner and more flexible way than its predecessor versions. Unlike the previous approach to Android unit testing based on JUnit 3, with JUnit 4, you do not need to extend the junit.framework.TestCase class. You also do not need to prepend the test keyword to your test method name, or use any classes in the junit.framework or junit.extensions package.
A basic JUnit 4 test class is a Java class that contains one or more test methods. A test method begins with the @Test annotation and contains the code to exercise and verify a single functionality (that is, a logical unit) in the component that you want to test.
The following snippet shows an example JUnit 4 integration test that uses the Espresso APIs to perform a click action on a UI element, then checks to see if an expected string is displayed.
@RunWith(AndroidJUnit4.class)
@LargeTest
public class MainActivityInstrumentationTest {
@Rule
public ActivityTestRulemActivityRule = new ActivityTestRule<>(
MainActivity.class);
@Test
public void sayHello(){
onView(withText("Say hello!")).perform(click());
onView(withId(R.id.textView)).check(matches(withText("Hello, World!")));
}
}
In your JUnit 4 test class, you can call out sections in your test code for special processing by using the following annotations:
@Before: Use this annotation to specify a block of code that contains test setup operations. The test class invokes this code block before each test. You can have multiple@Beforemethods but the order in which the test class calls these methods is not guaranteed.@After: This annotation specifies a block of code that contains test tear-down operations. The test class calls this code block after every test method. You can define multiple@Afteroperations in your test code. Use this annotation to release any resources from memory.@Test: Use this annotation to mark a test method. A single test class can contain multiple test methods, each prefixed with this annotation.@Rule: Rules allow you to flexibly add or redefine the behavior of each test method in a reusable way. In Android testing, use this annotation together with one of the test rule classes that the Android Testing Support Library provides, such asActivityTestRuleorServiceTestRule.@BeforeClass: Use this annotation to specify static methods for each test class to invoke only once. This testing step is useful for expensive operations such as connecting to a database.@AfterClass: Use this annotation to specify static methods for the test class to invoke only after all tests in the class have run. This testing step is useful for releasing any resources allocated in the@BeforeClassblock.@Test(timeout=<milliseconds>): Some annotations support the ability to pass in elements for which you can set values. For example, you can specify a timeout period for the test. If the test starts but does not complete within the given timeout period, it automatically fails. You must specify the timeout period in milliseconds, for example:@Test(timeout=5000).
For more annotations, see the documentation for JUnit annotations and the Android-specific annotations.
You use the JUnit Assert class to verify the correctness of an object's state. The assert methods compare values you expect from a test to the actual results and throw an exception if the comparison fails. Assertion classes describes these methods in more detail.
Android Testing Support Library APIs
The Android Testing Support Library provides a set of APIs that allow you to quickly build and run test code for your apps, including JUnit 4 and functional UI tests. The library includes the following instrumentation-based APIs that are useful when you want to automate your tests:
AndroidJUnitRunner- A JUnit 4-compatible test runner for Android.
- Espresso
- A UI testing framework; suitable for functional UI testing within an app.
- UI Automator
- A UI testing framework suitable for cross-app functional UI testing between both system and installed apps.
Assertion classes
Because Android Testing Support Library APIs extend JUnit, you can use assertion methods to display the results of tests. An assertion method compares an actual value returned by a test to an expected value, and throws an AssertionException if the comparison test fails. Using assertions is more convenient than logging, and provides better test performance.
To simplify test development, you should use the Hamcrest library, which lets you create more flexible tests using the Hamcrest matcher APIs.
Monkey and Monkeyrunner
The SDK provides two tools for functional-level app testing:
- Monkey
- This is a command-line tool that sends pseudo-random streams of keystrokes, touches, and gestures to a device. You run it with the Android Debug Bridge (adb) tool, and use it to stress-test your app, report back errors any that are encountered, or repeat a stream of events by running the tool multiple times with the same random number seed.
- monkeyrunner
- This tool is an API and execution environment for test programs written in Python. The API includes functions for connecting to a device, installing and uninstalling packages, taking screenshots, comparing two images, and running a test package against an app. Using the API, you can write a wide range of large, powerful, and complex tests. You run programs that use the API with the
monkeyrunnercommand-line tool.
'User Guide' 카테고리의 다른 글
| UI/Application Exerciser Monkey (39) (0) | 2016.06.10 |
|---|---|
| Getting Started with Testing (38) (0) | 2016.06.10 |
| Record a Video (36) (0) | 2016.06.10 |
| Take a Screenshot (35) (0) | 2016.06.10 |
| Logcat으로 로그를 작성하고 보기 Write and View Logs with Logcat (34) (0) | 2016.06.10 |
댓글